Saturday 29 February 2020

Just chicken in....!!

Hey everyone...

I'm up on the blog at "Gerda Steiner designs" and I have a card to share that I made using the super gorgeous stamp set "Chicken scratch"....

I wanted to create a fun little scene with the cheeky chicken above the group of piggies....
So I coloured up three piggies and the chicken using my Copic markers!!


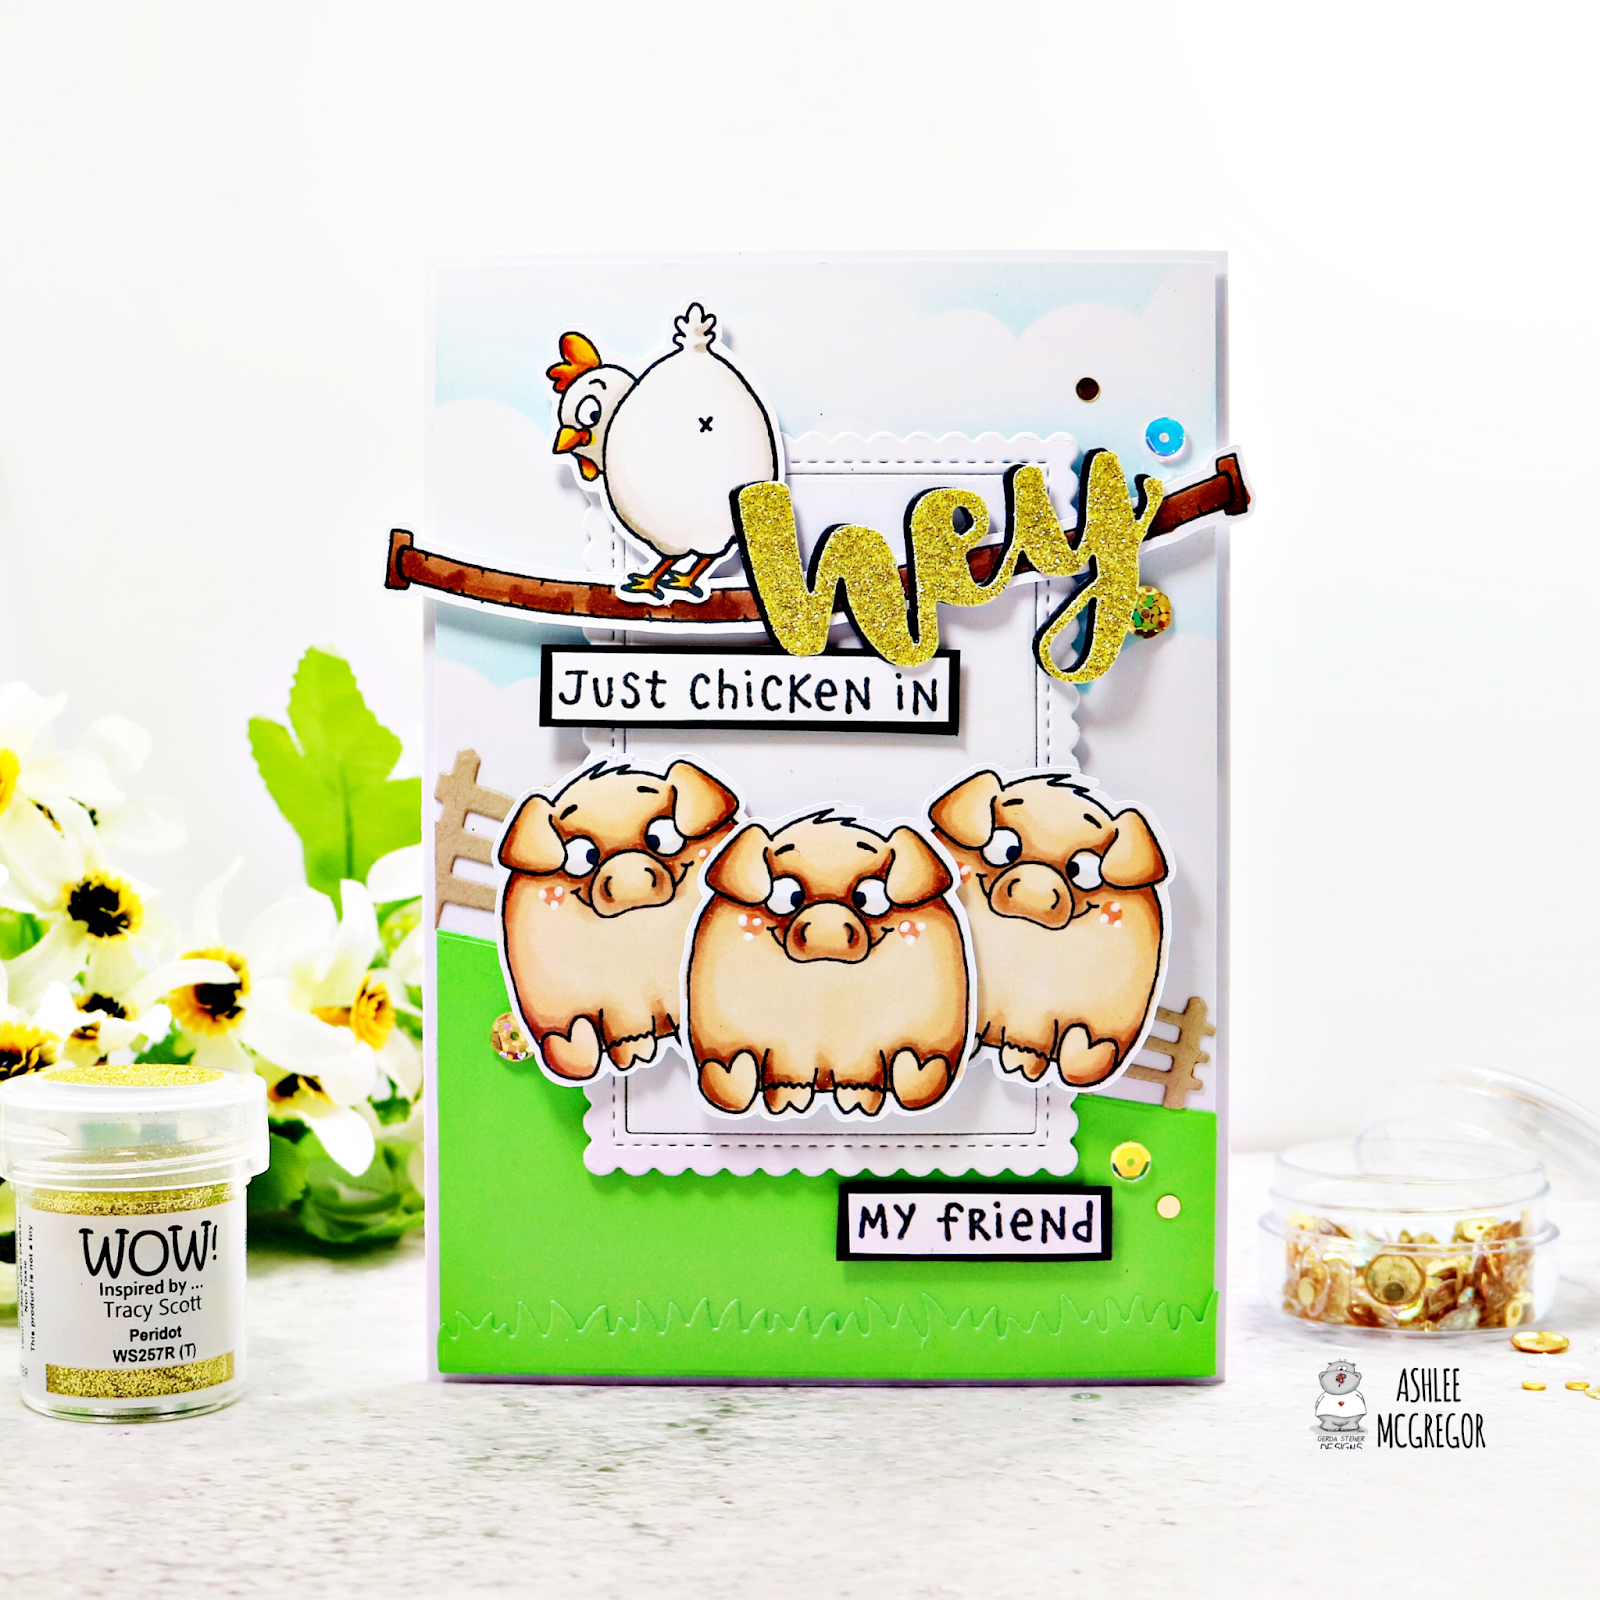
I made a farm background for the animals using some dies from MFT...
- Stitched mini scallop rectangle stax
- Spring scene builder

and stencilled in a cloudy sky!!


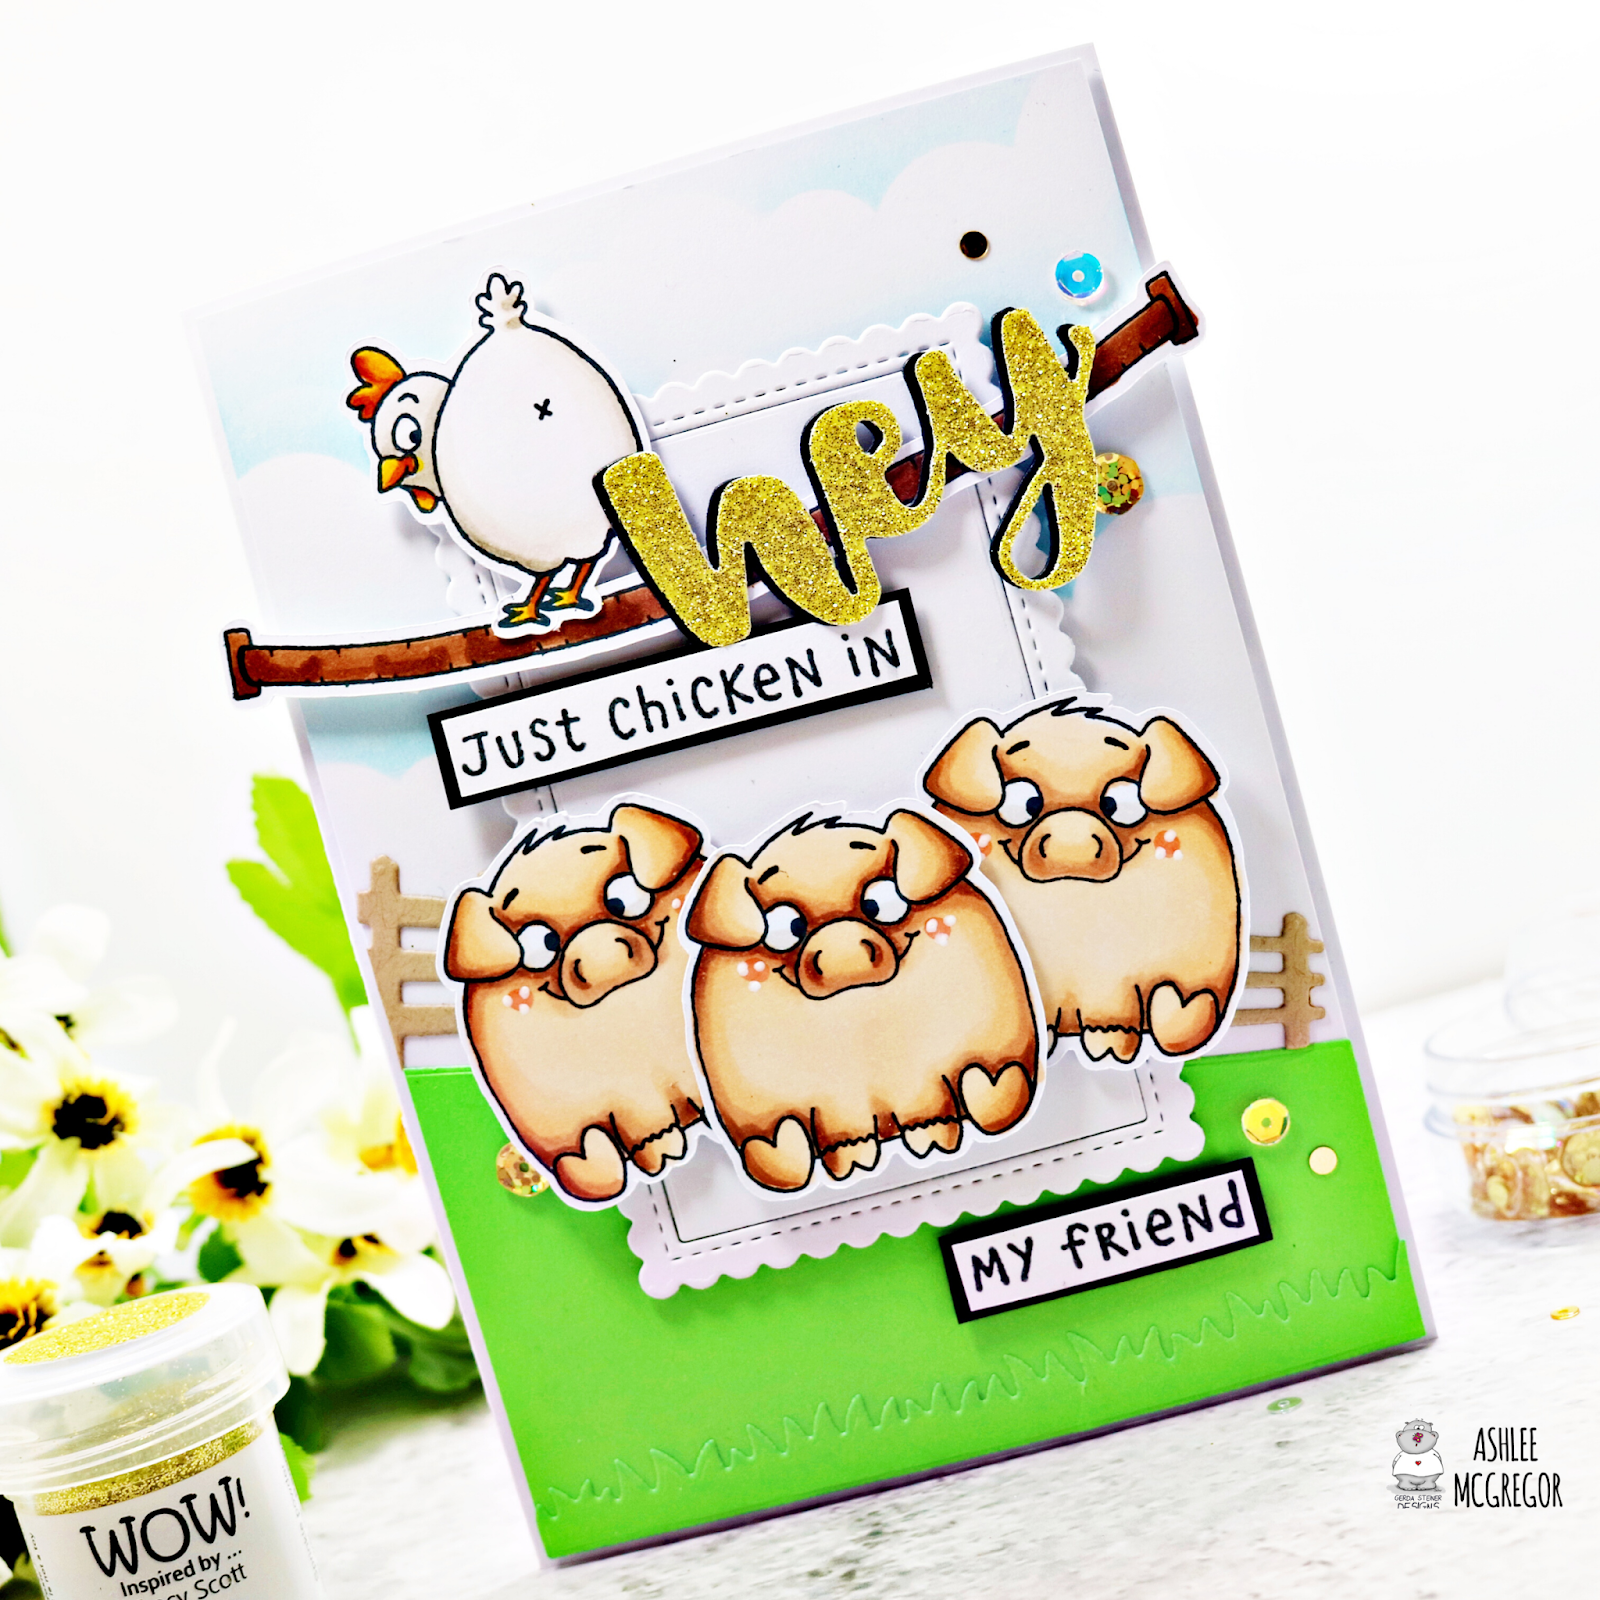
I die cut the Heffy cut "hey" and embossed using WOW! embossing Tracy Scott Peridot powder....
Using some black cardstock I die cut another hey and added it slightly off set to the embossed one to create a shadow effect!!

To finish off the card I added some Vegas Baby sequins from Catherine Pooler and attached them using micro glue dots (these glue dots are tiny and so perfect for adding sequins!!)...

Thanks for checking out my card, I hope you feel inspired to create a fun farm scene card too!!

Don't forget to check out the Gerda Steiner designs store for so many more awesome stamp sets perfect for anyones crafty stash!!

Happy crafting, Hugz Ashlee

Friday 28 February 2020

CAS new release....!!

Hey my crafty friends...

There is brand new release at "Create a Smile stamps" and boy oh boy you do not want to miss it!!

There is an awesome new range of stamps and stencils and I can't wait to get crafty with them all but today I have a card to share with you using one of the new stamp sets and stencils....

The stamp set is called "Quill and ink" and the stencil "Splotch"....


The splotch stencil works absolutely perfectly with this stamp set... 
a big patch of spilled ink!!

To create this card I first started with my splotch stencil and inked it up with Distress Oxide inks in Abandoned coral and Peacock feathers...


I then coloured up the three images from the quill and ink stamp set with Copics and fussy cut them out...

I arranged them to create my little inky writing scene and added them to the card base with some foam tape for dimension!!

Finished it all off with some pretty Catherine Pooler sequins from the big surr mix and it was complete...

Thanks for stopping by and checking out my new release card, I hope you enjoyed it and also don't forget to pop by the Create a Smile store and check out all the new goodies!!

Happy crafting, Hugz Ashlee 

Wednesday 26 February 2020

FEBRUARY Club sursee....!!

Hey everyone....

I'm here tonight to share with you a bunch of cards that I made using the latest Club sursee products from "Catherine Pooler"....

I absolutely love receiving this every month and the products included are always amazing!!

There is two club sursee subscription options..

- Basic (two stamp sets) 
- Deluxe (two stamp sets and dies plus whatever else CP decides to add in)


How beautiful are all these flower image stamps....

I love that all the images included are perfect for all sorts of occasions!! 


I was inspired to create a beautiful vase of flowers sitting on the table for this one and the die worked perfectly for a patterned table cloth....


You can create pretty backgrounds using the flower die too....


All these cards were created using only the products included in the deluxe club sursee subscription (Minus the inks, cardstock and sequins)....

I used a mix of CP inks for these cards 
- Lime Rickey
- Party Dress
- Tiki Torch
- Aquatini
- Tiara 
- Black Jack

I totally recommend checking out club sursee, it is so much fun and who doesn't want crafty happy mail every month right??!!

Happy crafting everyone, Hugz Ashlee

Tuesday 25 February 2020

Happig birthday friend......!!

Hello crafty friends...

I absolutely adore the "Punny farm pigs" from "Miss Ink Stamps" so I couldn't resist colouring them up again to create this birthday card for a friends...

I coloured them all up using Copic markers so I will add a list just below of the colours I used....

PIGS - E50, E51, E11, E23
HATS - BG32, BG34, BG45, BG49, BG18


To create this card I started by stamping my background using Waffle flower stamp set "simply plaids" and Catherine Pooler Black Jack ink... 

I then die cut the "Hello friends" from hello bluebird in white and teal cardstock so that I could layer the large hello piece and just have the friend in white.... 

I then stamped the sentiment from funny farm pigs using the same ink I used for my background and mounted in grey cardstock...

I added on my pigs to create a little party scene and finished it all of with some sequins!!

I think it looks like these piggies are having a great old time celebrating don't you? 

Thanks for stopping by today, I hope you enjoyed my card!!
Happy crafting, Hugz Ashlee

Tuesday 18 February 2020

Brewtiful....!!

Hey everyone..

I'm up on the "Miss Ink stamps" blog with this card featuring an ink smooshed background with embossing detail using the WOW! ink refill tool....


You can pop on over to the "Miss Ink blog" for all the details on this card, how I created it and the products used...

Hope you enjoy the post, Hugz Ashlee

Monday 17 February 2020

WOW! Embossing glitter background....!!

Hey everyone...

I have some inspiration for you to fit our monthly theme at WOW! embossing fans group over on Facebook "Embossing glitters/glints"!!

(This is one of my cards that was featured on Hochanda TV when WOW! was on!!)

To create this card I first started with a white card base and ink blended on some Catherine Pooler Aquatini ink half way up the card base....


I made sure before going onto the next step that my ink was dry and then dusted over it with an anti static tool...

Using my WOW! embossing ink I stamped the WOW! tropical stamp and heat embossed it using the beautiful embossing glitter Aventurine!!


I die cut the word FRIEND from an MFT die-namic out of some teal coloured cardstock and added it onto the embossed card base using some foam tape so that the word was slightly lifted off the background....

Using the WOW! Beautiful stamp set I added an embossed sentiment done using some black cardstock and opaque bright white embossing powder....


The little droplets on the card were made using some WOW! melt it powder with embossing powder mixed in (unfortunately I can't remember which shade of embossing powder I used for that oops naughty me)...

To create the droplets just mix some melt it powder with your selected embossing powder, melt it till fully molten with your heat gun in a little tin pan and then drop little pieces onto a non stick craft mat!!

I hope you enjoy this embossing glitter inspiration and come and join us in our monthly theme at WOW!, I know we would all love to see what you create...

Happy embossing, Hugz Ashlee


Friday 14 February 2020

Birthday cake....!!

Hey my crafty friends..

Have you seen the brand new set "Meerkats on the lookout" at "Gerda Steiner Designs"??!!
(Co-ordinating dies also available)

OMG it is the cutest set ever!!!! 
I put in a request to Gerda awhile ago for meerkats and she has absolutely outdone herself they are even cuter than I imagined a Gerda meerkat to be....LOVE!!


I am enjoying making tags so much lately, they are perfect to add to crafty birthday gifts....

I started out making the tags by die-cutting the Heffy doodle tag along die in white cardstock twice...

On the base die cut I masked off the bottom piece and inked with Ground espresso distress oxide ink. Once I removed the masked piece of tape I added some clouds using an MFT mini cloud edge stencil and Salty ocean distress oxide ink...


I stamped a sentiment onto each of the tag bases using Memento tuxedo black ink...

Using the same ink I stamped the meerkats on some xpress-it blending cardstock and coloured with Copic markers...


I finished off both the tags by adding some blue/white twine and they were done...

I think these would work well for male or female gift tags and I can't wait to add them to a present!! That birthday cake sentiment is so perfect for them too...

I hope you enjoy my new tags and feel inspired to create some of your own meerkat tags!!

Happy crafting, Hugz Ashlee

Tuesday 11 February 2020

Nuttin without you....!!

Hey everyone...

"Miss Ink stamps" has a super fun squirrel set called "Oh nuts" and I think they work perfectly for valentines/love theme cards...

I created this one by starting with a bright background using the stamp set "Outline love combo" from "Waffle flower crafts" and stamping it in memento tuxedo black ink for the outline and filling it in with a colourful mix of Catherine Pooler inks!!

- Be mine
- All thats Jazz
- Grape crush 
- Samba


I also filled in the spaces of the LOVE using some Starlight Sparkles from 
"WOW! embossing" for a sparkly touch....


Using some WOW! embossing Opaque bright white I embossed the "I'm nuttin without you" on some black cardstock and added it below the background LOVE but popped it up with some foam tape....

I coloured up the super cute squirrel with Copic on some X-press it blending cardstock and also added that with foam tape...

I then finished the card off a touch of sequins!!

I hope you enjoy tonights card and it gives you some inspiration for those valentines cards...
Hugz Ashlee

Friday 7 February 2020

Friendship is a blessing....!!

Hey everyone....

This month our theme at WOW! embossing is embossing glitter/glints so for my card I have featured a glitter embossing powder called Picnic basket with Angel eyes and Love is the drug embossing powders!!


To create this card I first started off with a white card base and using an MFT background stamp called Watercolour stripes I stamped over the whole base piece using a light grey ink...

I then stamped a sentiment using Memento tuxedo black ink from the Waffle flower stamp set Sweet sentiments that is included in the mailbox combo....


Next step was to cut out a mixture of sizes of the gorgeous envelopes from the Waffle flower mailbox die.... 

(This die set has a variety of envelope shapes/designs along with a super cool mailbox)

Once I cut out the amount of envelopes I wanted I selected what colour WOW! embossing powders I wanted to use and then started embossing with my WOW! dual heat gun!!


I like to emboss my die cuts by die cutting them first and then pushing them on the top of my WOW! embossing ink pad, covering in powder of choice and then embossing but you could do it by embossing a piece of cardstock first and then die cutting them from that....


I arranged the envelopes all over the card base and then mounted them into position with varying layers of foam tape for dimension....

To finish them off a touch of sequins for some bling!!

Here's a closer look at all the awesome WOW! products I used to create this card....


I hope you enjoy my WOW! embossing inspiration for today and dont forget to come on over to the Facebook fans group and share with us your creations using the monthly theme....

I know we would all love to see them and you would then be in with a chance at some shopping dollars at the WOW! embossing store and who doesn't love a little credit right??!!

Happy embossing everyone, Hugs Ashlee.

Tuesday 4 February 2020

Just because....!!

Hey my crafty friends...

Sometimes it's nice to send a card to our friends just because so this one I have to share with you is just for that!! 

I used some lovely products from "Miss Ink stamps" for this one...


To create the background I used the "Paint stroke floral" stencil with some distress oxide inks in the colours Wilted violet, Mermaid lagoon and Twisted citron....

I blended a mix of the three colours over a masked off piece on my card base and once I removed the stencil I added a splatter of Wilted violet that I had mixed with water!!


Don't feel like colouring?! Stamping a beautiful image like this one from the "Gardenia" stamp set and leaving it black/white I think is a great way of using your stamps, keeping the image as a focal point!!

I finished off the card with a sentiment that I embossed with WOW! opaque bright white powder on black cardstock from the "Everyday sentiments" stamp set....

A touch of sequins and it was complete. 

I hope you enjoy tonights card and I hope to see you back here again soon, 
Happy crafting, Hugz Ashlee

Sunday 2 February 2020

Pot luck HOTSTUFF....!!

Hey everyone....

Have you all been enjoying the AMAZING new release In the kitchen from "Catherine Pooler"??!! 

I seriously can't get enough of it hehe....

Here are a couple more cards I have created with the "Lick the bowl bundle" and I will definitely have more to share soon....


These products are perfect to use with colours that create a retro vibe so that's what I was going for....

I used CP inks that co-ordinated with the designer CP paper pad also from the In the kitchen release called Potluck party!!

Card one Inks - Sauna, Mandarin spice, Eucalyptus.
Card two Inks - Sauna, Eucalyptus, Icing on the cake. 


This second card I used the new "Lava lamp coverplate" and layered it on a piece of the potluck designer paper....

In this release there is also a "Staples bundle" which includes some dies, paper pad and a sequin mix and they all co-ordinate and work super well with the collection!!

The dies I have used on both cards to create backing pieces for my images....

How cool is that HOT STUFF sentiment right??!! It's such a fun sentiment and perfect to stamp with multiple layers of colour too!!

That's all from me for tonight, I hope you enjoy these two cards and have fun checking out the latest CP release.... 

Happy crafting, hugz Ashlee

Saturday 1 February 2020

Meow & Forever....!!

Hey everyone....

I'm up on the blog at "Gerda Steiner designs" today with this card I made using the brand new set "Valentine cats" perfect for those valentines day cards!!


To create this card I first started off with a white piece of card that I covered with some double sided adhesive. Using WOW! flock I covered the whole of the adhesive, pressed it in and then tipped off the excess. This creates a lovely flock piece ready to use for die-cuts!! 

Using the flock piece I die cut a whole heap of hearts and placed them all over the card base. 


I die cut a tag from MFT Trendy tag in pink and white cardstock and added a piece of paper twine to the top. Another flock heart, the sentiment and of course the super cute kitty finished off the tag!!

(The kitty was all coloured with Copics)

To finish off the card I added lots of pretty rhinestones from a Studio Katia mix....

I hope you enjoy this Valentines themed card and it gets your creative juices flowing!!
Happy crafting, Hugz Ashlee